Base IMIS Deployment Manual (Windows Environment)
- Basic Requirements
- Tools Installation
- Web Application Setup
- Database Setup
- Setup GeoServer
- Add New Layers
- Start IMIS Application
Basic Requirements
The deployment manual is based on the specific system requirements mentioned below and any deviations will require adjustments to the deployment process. The specific system requirements mentioned below are recommended to ensure a smooth and error-free deployment process.
1.1 Prerequisites
The tools mentioned below need to be installed in the system for IMIS deployment. The Installation guide is shown in Section 2.
|
· XAMPP · Composer · Node JS · PostgreSQL · PostGIS · GeoServer |
1.2 Deployment Engineer Requirements
The recommended skillset for the deployment engineer conducting the deployment of IMIS is mentioned below. These skillsets are critical to ensure smooth and error free deployment and maintenance of IMIS.
|
· PostgreSQL · PostGIS extension of PostgreSQL · GeoServer |
Apart from the deployment engineer, the minimum recommended skillset for the development/ maintenance team is mentioned below:
|
· PHP language · Laravel Framework · PostgreSQL · PostGIS extension of PostgreSQL · NPM package manager · Git version control · GeoServer · JavaScript · jQuery · Open Layers (OL) · Technical Documentation |
Tools Installation
2.1 Localhost Server (WAMP Server) Installation
To set up a local server, download and install WAMPP from the official website. WAMP Server is recommended due to its ability to handle multiple PHP versions.
IMIS requires PHP version 8 or higher, as this version is essential for compatibility. Any version changes will require modifications to the deployment process and source code.
Once WAMPP is installed, launch the Apache server, and check the PHP version by navigating to http://localhost/dashboard/phpinfo.php. Ensure the PHP version is at least 8; if not, update WAMP Server or manually configure PHP to use version 8 executable if available. Additionally, ensure that the following extensions are installed:
• ext-zip
• pdo_pgsql
• pgsql
2.2 Composer InstallationComposer is essential for managing dependencies in Laravel applications. Download and install Composer (V 2.2.7) globally from the https://getcomposer.org/, enabling system-wide access.
To confirm successful installation, open the command prompt and run:
|
Composer -v |
This command verifies that Composer is installed correctly and ready for managing Laravel dependencies.
2.3 Database Installation
IMIS is designed and developed with PostgreSQL (V 14) database. For GIS data storage and processing, the PostGIS extension (V3) is used.
2.3.1 PostgreSQL Download and Installation
Download PostgreSQL (V14) from the official website
https://www.postgresql.org/download/
During installation, use default port 5432, or adjust it if needed to avoid conflicts.
Be sure to select essential tools like pgAdmin, which provides an intuitive interface for database management, query execution, and PostgreSQL configuration—making setup and ongoing management easier.
2.4 PostGIS Extension
PostGIS is required within PostgreSQL to enable GIS (Geographic Information System) data management for IMIS.
2.4.1 Enable PostGIS Extension
To install PostGIS,
Locate Your PostgreSQL Installation:
• Open File Explorer.
• Navigate to C:\Program Files\PostgreSQL.
• Identify the version of PostgreSQL you have installed (e.g., C:\Program Files\PostgreSQL\14).
Open Stack Builder:
• Inside the PostgreSQL installation folder, go to the bin subdirectory (C:\Program Files\PostgreSQL\14\bin).
• Run the StackBuilder.exe application.
• In Stack Builder, select your PostgreSQL version, then locate "Spatial Extensions" and choose PostGIS.
Follow the prompts to complete the installation, which will enable PostgreSQL to handle spatial and geographic data.
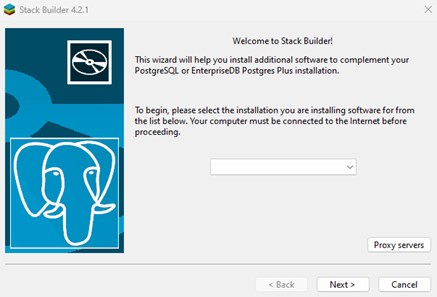
Figure 1 Stack Builder
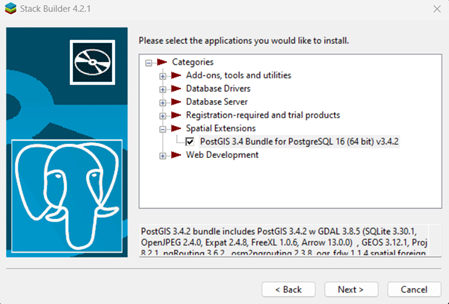
Figure 2 Select PostGIS extensions
2.5 GeoServer Installation
IMIS currently uses Geoserver (V2.21.0) for rendering and displaying spatial data maintained in the system. This specific version of Geoserver is recommended to ensure bugs/issues do not arise in the system.
2.5.1 GeoServer Download
Downloading V2.21.0 from the Geo Server page on Source Forge.
https://sourceforge.net/projects/geoserver/files/GeoServer/2.21.0/GeoServer-2.21.0-winsetup.exe/download
Geo Server requires a Java Development Kit (JDK) version 11.
Download the appropriate JDK installer for your operating system from the Oracle JDK website or from:
https://adoptium.net/en-GB/temurin/releases/?os=windows&version=11&package=jdk
Then install it in the Java folder within Program Files. Once the JDK is installed, configure it in your system’s environment variables so that applications can recognize Java.
[Note: Remember the username and password during installation process.]• Open System Properties > Environment Variables
• Under System Variables, locate the Path variable, click Edit, and add the path to the JDK's bin directory (e.g., C:\Program Files\Java\jdk-11\bin).
• Click OK to save the changes.
• Once the JDK is configured, run the Geo Server installer and follow the prompts to complete the installation.
• Make sure to browse the JDK path, while adding just add JDK path not the bin path.
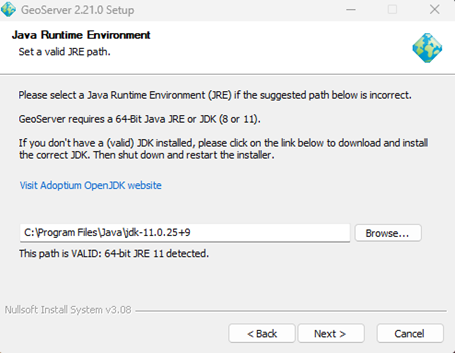
Figure 3 Intallation of geo server(Browse the path to JDK)

Figure 4 Add port 8080
2.5.2 Install Plugins for Geo Server
To enhance GeoServer functionality, certain plugins are essential.
a) CSS Plugin
Download the CSS Plugin using the following link:
https://sourceforge.net/projects/geoserver/files/GeoServer/2.21.0/extensions/geoserver-2.21.0-css-plugin.zip/download
b) Query Plugin
Download the Query Plugin using following link
https://sourceforge.net/projects/geoserver/files/GeoServer/2.21.0/extensions/geoserver-2.21.0-querylayer-plugin.zip/download
c) Printing Plugin
Download the Printing Plugin using following link
https://sourceforge.net/projects/geoserver/files/GeoServer/2.21.0/extensions/geoserver-2.21.0-printing-plugin.zip/download
d) Copying the Plugins
Once downloaded, unzip the files and copy all the files with jar extension and place it in following path:
C:\Program Files\GeoServer\webapps\geoserver\WEB-INF\lib
Once successfully added the plugins restart the GeoServer.
Web Application Setup
The following steps are recommended to be carried out to ensure set up of IMIS web application in windows environment.
3.1 Clone the IMIS project from GitHub
To initiate the deployment of IMIS on a local Windows environment, start by cloning the project files directly from GitHub.
Open a command prompt or terminal with administrative privileges, switch to the htdocs directory, and execute the following Git command to clone the IMIS repository:git clone <github_repo_link>
This command copies all files from the remote repository to your local htdocs folder, making the IMIS codebase available for further setup steps. After cloning, you’ll see a new folder with the repository name in htdocs.
3.1.1 Folder Setup
Two folders need to be created manually to store building survey KML files sent via mobile application and the emptying receipts and house images as well.They can be done by following steps:
• Navigate to storage/app/public
• Make new folder and name it “building-survey-kml”
• Make another folder and name it “emptyings”
• Inside “emptyings” folder make two folders and name them “houses” and “receipts”
3.2 Install Dependencies
Launch a command prompt or terminal and use the cd command to navigate to the IMIS project directory within htdocs (commonly located at C:\xampp\htdocs\imis-revamp2.0). Once the terminal is set to the project root, run the following command:
composer install --ignore-platform-reqs
This command uses Composer to download and install all required PHP packages and libraries listed in the composer.json file. These libraries are essential for Laravel and IMIS to function properly.
3.2.1 Install JavaScript Dependencies
Install node v20.17.0
https://nodejs.org/en/download/prebuilt-installer
Execute the following commands to install and compile frontend dependencies:
npm install && npm run dev
The npm install command will download all required JavaScript dependencies, while npm run dev compiles assets, such as CSS and JavaScript files, for development. This step is essential for building the frontend of the IMIS application, ensuring all stylesheets and scripts load properly.
3.2.2 Generate The Application Key
In the terminal, within the IMIS project directory, run the following command
php artisan key:generate
After running the command, you’ll see an output message confirming that the application key was successfully generated. The .env file will now contain a line like
APP_KEY=base64:yourGeneratedKeyHere
Database Setup
4.1 Blank Database Import
A blank database of the IMIS is maintained in the GitHub organization under the repository deployment_documentation. This blank database is imported into PostgreSQL through pgAdmin. The database server (PostgrSQL) must be connected through pgAdmin initially: For the steps refer to Section Connect to db through pgadmin.

Figure 5 Select Restore and choose the provided database to restore
Step 1 : Download the blank database from the GitHub repository.
Step 2 : Open pgAdmin and connect to your PostgreSQL server.
Step 3 : Navigate to your server's "Databases" folder.
Step 4 : Right-click on the target database where you want to import the schema and data, and then select "Restore..." from the context menu.
Step 5 : Under the "Format" section, choose "Custom or Tar" from the dropdown menu. This format allows you to import both schema and data together. Browse the file by clicking on the "..." button in the "Filename" field.
Step 6 : Select the correct format of the file you are restoring, dump or backup.
Step 7 : Go to “Data Options” tab, under the "Do not save" section, check the box labeled "Owner".
Step 8 : Click "Restore”.
Step 9 : If prompted, enter the password for the database superuser.
Step 10 : Update the .env file in the web-application server with the corresponding values of the database, such as database name, credentials, etc.
The restoration process will start, and pgAdmin will import the schema and data into the target database. The time it takes to complete depends on the size of the database dump. Explore the tables and other database objects to verify that the schema and data have been imported.
Note: When restoring a PostgreSQL database, permission issues could arise if the original owner specified in the backup does not exist on the target system. To overcome this issue, Exclude Ownership Restoration as mentioned in Error! Reference source not found.. This corresponds to the `--no-owner` flag, telling pgAdmin not to set ownership of the objects to the original user from the backup.
4.2 Configure Environment Variables (.env)
Configure the environment settings for the IMIS project, which define essential application and database connection parameters.
In the IMIS project directory, locate the .env.example file. Copy this file and rename the copy to .env. This file will hold environment-specific settings for your local IMIS deployment.
Open the .env file in a text editor and set the following configurations for the PostgreSQL database connection and set the appropriate paths for the different provided variables as well:
|
|
||||||||||||
|
4.3 Database Seeder
The default look-up values for various dropdowns and default roles, permissions and user access can be setup through the seeder. Run the database seeder command:
php artisan db:seed
4.4 Importing Data into IMIS
The blank database provided does not contain any data apart from the look up values updated through the seeder. The initial dataset obtained from the survey must be cleaned and processed into individual SQL dump files, that follows the naming standards and data types as mentioned in the data dictionary. The table names, field names and data types must exactly match the data dictionary/ database.
4.4.1 Data Importing Sequence
As the IMIS is developed based on a relational database, the import sequence of the datasets must be followed strictly to ensure that there are no issues during the importing process. The import sequence is provided below:
|
S.N. |
Schema Name |
Table Name |
Type |
|
1 |
layer_info |
citypolys |
spatial |
|
2 |
layer_info |
landuses |
spatial |
|
3 |
layer_info |
waterbodys |
spatial |
|
4 |
layer_info |
wardboundary |
spatial |
|
5 |
layer_info |
grids |
spatial |
|
6 |
layer_info |
wards |
spatial |
|
7 |
layer_info |
ward_overlay |
spatial |
|
8 |
layer_info |
sanitation_system |
spatial |
|
9 |
utility_info |
roads |
spatial |
|
10 |
utility_info |
water_supplys |
spatial |
|
11 |
fsm |
treatment_plants |
spatial |
|
12 |
utility_info |
sewers |
spatial |
|
13 |
utility_info |
drains |
spatial |
|
14 |
layer_info |
places |
spatial |
|
15 |
layer_info |
low_income_communities |
spatial |
|
16 |
building_info |
buildings |
Spatial |
|
17 |
fsm |
containments |
Spatial |
|
18 |
building_info |
build_contains |
Non-Spatial |
|
19 |
building_info |
owners |
Non-Spatial |
|
20 |
fsm |
toilets |
Spatial |
|
21 |
fsm |
build_toilets |
Non-Spatial |
4.4.2 Importing Spatial Data
To import any table, follow the data dictionary and prepare data layers in QGIS with proper column name then import data into PostgreSQL database.
Step 1 : Data Preparation: Create PostgreSQL SQL Dump file (repeat the same process for all the spatial data), ensure the table name, field names and data formats matches exactly with the data dictionary/database.
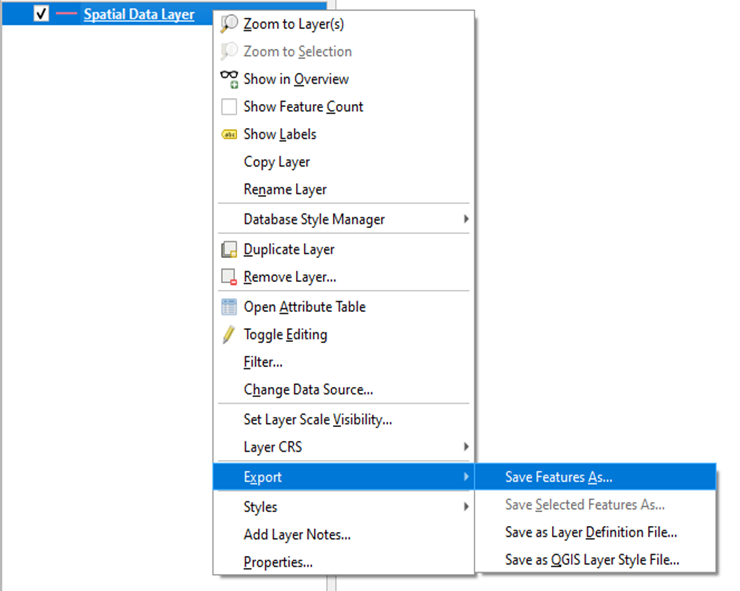
a. Select the ‘Spatial data Layer’ with all the required attributes (following the data dictionary)
b. Right click and go to ‘Export’ option and select ‘Save Feature As…’
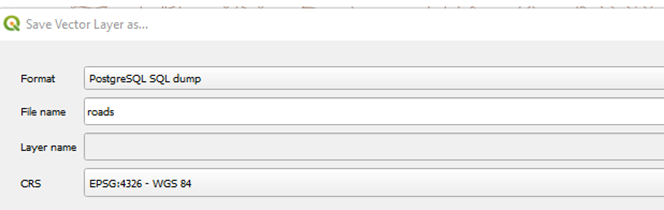
Step 2 : Select the format: ‘PostgreSQL SQL Dump’
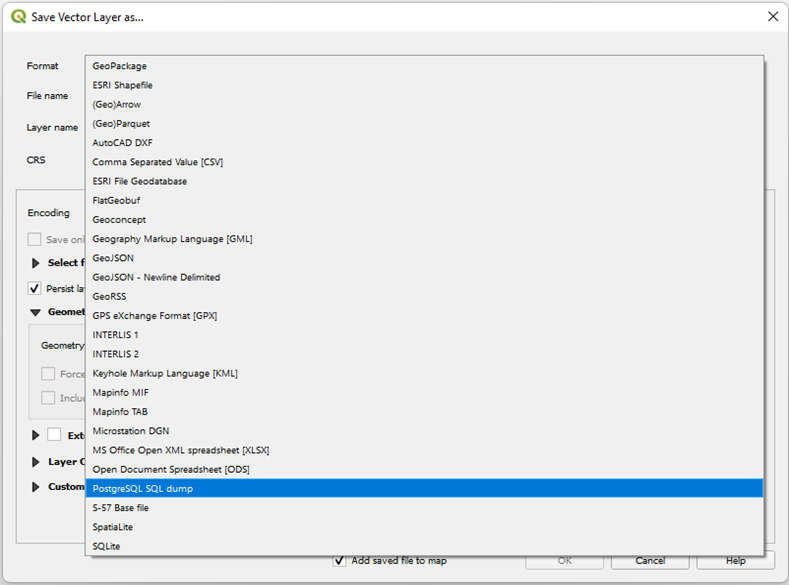
a. Select File Location and Give filename same as Table Name.
Example: for table roads:
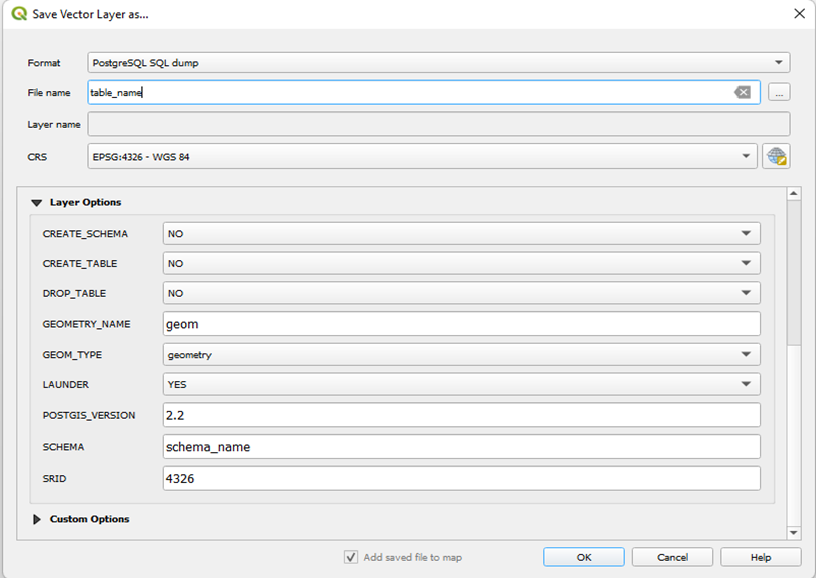
b. In Layer Options:
i. CREATE_SCHEMA: NO
ii. CREATE_TABLE: NO
iii. DROP_TABLE: NO
iv. GEOMETRY_TYPE: GEOM
v. SCHEMA: SCHEMA_NAME
vi. SRID: 4326
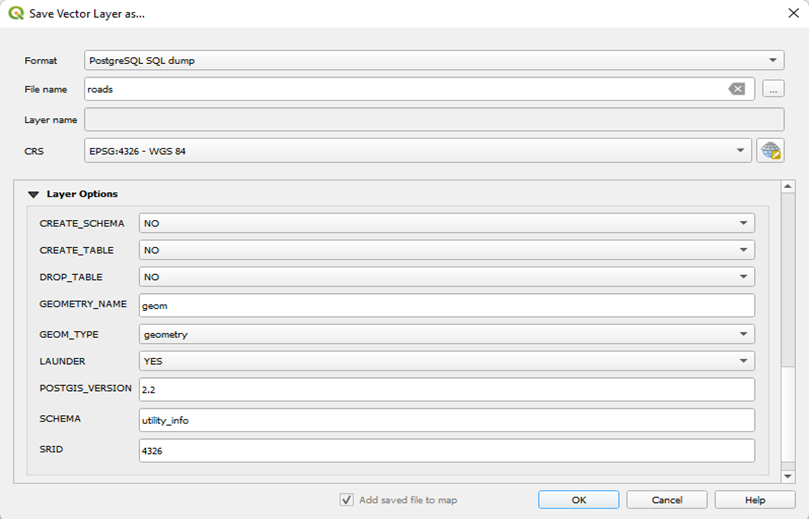
c. In Layer Options: For Table ‘roads’
Step 3 : Import into database via Pg-Admin.
a. Open Pg-Admin.
b. Open/Connect to Database
c. Right click and open the Query Tool.
d. Click on ‘Open file’ icon and select the exported SQL Dump File.
e. Click on ‘Run’ Button and execute the commands.
f. Check if all the data has been imported or not.
4.4.3 Importing Non-Spatial / CSV Data
Step 1 : Launch pgAdmin and connect to your PostgreSQL database server.
Step 2 : Right-click on the table where you want to import the CSV data.
Step 3 : Select ‘Import Data’ from the right-click menu.
Step 4 : In Filename option, navigate to your CSV file's location and select the file.
Step 5 : Choose CSV from the format options.
Step 6 : If the CSV file has column headers in the first row, check the Header box.
Step 7 : Click OK to start the import process.
4.5 Build and Triggers Functions Setup
Functions and Triggers are used in IMIS to automate and streamline database operations that perform specific tasks within the database, such as updating counts in real-time, supporting map tools, and import modules. Triggers are used in IMIS to automatically execute predefined actions in the database, such as updating counts maintaining data consistency, whenever data insertions occur, without manual intervention. This setup improves overall performance by executing predefined actions efficiently, making the system responsive.
Run the following commands to build all the necessary functions and triggers required for the system to function correctly:
Creates Functions and triggers to update count for grids &wards and summary chart
php artisan buildfunction:updatecount
Creates or replace (Or Delete and create) maptool queries if not exists functions
php artisan buildfunction:maptool
Creates Functions to create table when new data is imported for tax payment, watersupply and swmpayment:
php artisan buildfunction:taxphp artisan buildfunction:watersupply
php artisan buildfunction:swmpayment
Create quarters data for FSM KPI dashboards.
php artisan kpi:cron
When importing data in bulk or during the initial setup, it’s recommended to disable the trigger, update the count manually, and then re-enable the trigger to ensure accurate data processing without unnecessary overhead during the import process.
4.6 Summary Data Count Update
During the initial setup or after importing data, you need to update the count in the summary tables manually, but once the system is up and running, a trigger will automatically update the count each time new data is added.
To update grids & wards count when buildings have changes
php artisan updatecount:buildings
To update grids & wards count when fsm.containments has changes
php artisan updatecount:containments
To update grids & wards count when utility_info.roads has changes
php artisan updatecount:roadlines
To update grids & wards count when fsm.applications has changes
php artisan updatecount:applications
Setup GeoServer
GeoServer includes several styles designed for IMIS. To set up these styles in IMIS, create a workspace and corresponding datastore connecting to the IMIS Database after installing GeoServer. The corresponding information related to the names and other attribute information related to the workspace, stores, layer and styles information including CSS, SLDs, and SQL queries are included and regularly maintained in the technical document section with the filename `geoserver_document.md` within the documentation sub-directory in the GitHub repository named web-app source code. To create a new workspace, store, layer, and styles in a geoserver, follow the steps as mentioned in Section Creating New Workspace, Store, Layer & Style in Geoserver. Each workspace, store, layer and style must be created to ensure the proper functioning of the map interface. Currently, there is one workspace, nine stores, thirty layers and one hundred and seventeen styles. Each of these must be created as per the geoserver_document.md values in the newly set up geoserver. Alternatively, the present workspace is also provided in the GitHub repository under the deployment_documentation in the sub-directory geoserver_workspace_setup, which can also be imported into the geoserver through minor modifications to the XML file that is mentioned below.
To launch GeoServer, start the GeoServer service and navigate to http://localhost:8080/geoserver in your web browser. This URL directs you to the GeoServer homepage. Log in using the username and password configured during the installation process.

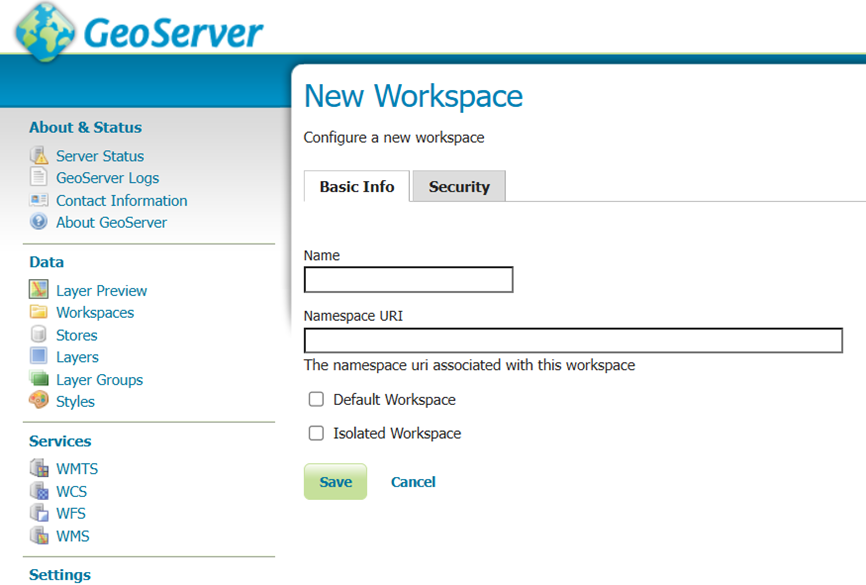
5.1 Add New Workspace
After logging into GeoServer, create a new workspace by navigating to the Workspace in the left-side menu and selecting Add new workspace.

Add a new workspace, for the workspace add the name of the current database that we are working on. For NameSpace URI add the URI that we are currently working on. In our local deployment Namespace URI may be localhost:8000
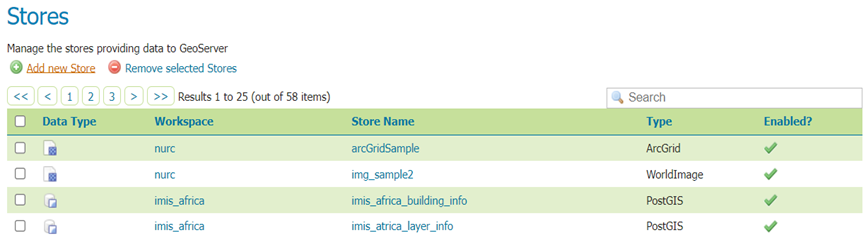
5.2 Add New Store
To add a new store in GeoServer, follow the steps mentioned below
• On the left sidebar, select Stores.
• This will open the main Stores page where existing stores are listed.
• On the Stores page, look for the Add New Store link or button.
• Click Add New Store to open the form for entering the details of the new store.
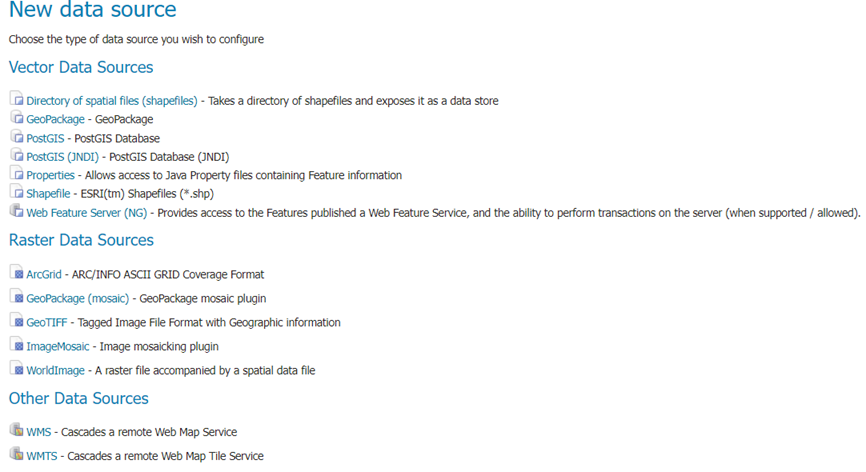
It will take you to new data source page where we are working with POSTGIS so we will select that:
After this will direct to the page where we will add details about new vector data source, On this page, you’ll first encounter the Basic Store Info section.
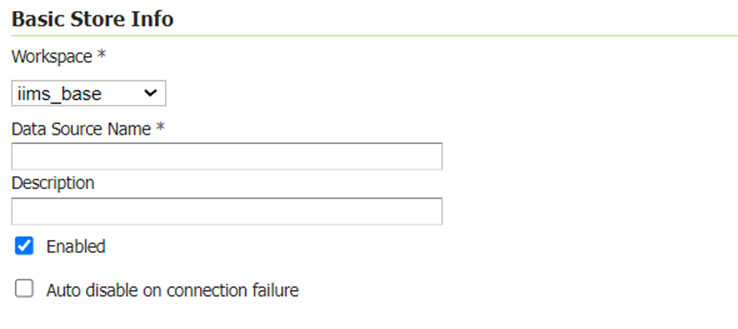
• On the Workspace, dropdown select workspace you have created.
• In Data Source Name you need to give the name as given in the GeoServer Documentation in Git Hub Organization.
[Note: While adding store for “layer_info” make sure you tick “Expose Primary Key” option.]
After this on the connection parameters section:

• On database label, put the database name which you are working on.
• On the schema put the schema name you are working on.
• For the user and password, you will put the credentials used for the pgAdmin.
Once finished, click on the apply and then save.
5.3 Add New Layers
To add a new layer in GeoServer, follow the steps below
• On the left sidebar, select Stores.
• This will open the main Layers page where existing Layers are listed.
• On the Layers page, look for the Add New Layer link or button.
• Click Add New Layer to open the form for entering the details of the new Layer.
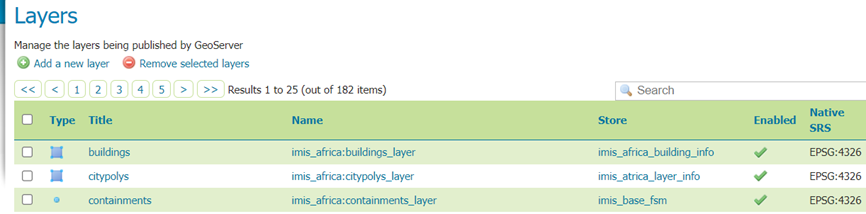
To add the new layer select the table you want to add layer to.
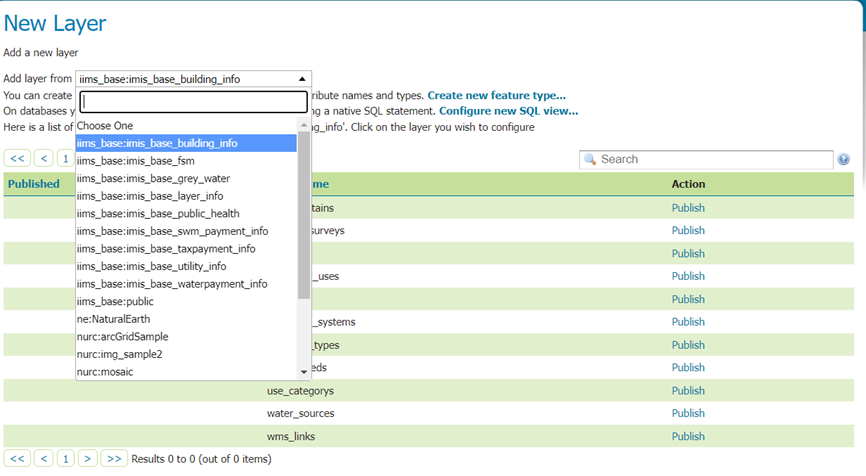 Figure 6 Adding new layer
Once you have chosen the table you can either publish or Configure new SQL view, which you can see in the figure 5.
5.6 Resolving CORS Errors in GeoServer
If you encounter a CORS error in the web interface during deployment, follow these steps to resolve it, Locate the following path
C:\Program Files\GeoServer\webapps\geoserver\WEB-INF\web
Open web.xml as administrator, and uncomment the following section
<!-- Uncomment following filter to enable CORS in Jetty. Do not forget the second config block further down. -->
<filter>
<filter-name>cross-origin</filter-name>
<filter-class>org.eclipse.jetty.servlets.CrossOriginFilter</filter-class>
<init-param>
<param-name>chainPreflight</param-name>
<param-value>false</param-value>
</init-param>
<init-param>
<param-name>allowedOrigins</param-name>
<param-value>*</param-value>
</init-param>
<init-param>
<param-name>allowedMethods</param-name>
<param-value>GET,POST,PUT,DELETE,HEAD,OPTIONS</param-value>
</init-param>
<init-param>
<param-name>allowedHeaders</param-name>
<param-value>*</param-value>
</init-param>
</filter>
<!-- Uncomment following filter to enable CORS -->
<filter-mapping>
<filter-name>cross-origin</filter-name>
<url-pattern>/*</url-pattern>
</filter-mapping>
5.7 Importing New Workspace, Store, Layer & Style in Geoserver
To streamline the process of importing manually creating the individual workspaces, stores, layers and styles in geoserver, an alternative approach is to import the entire workspace into geoserver directly. The workspace is provided in the GitHub repository.
Download the zip file and follow the instructions provided below to import the existing workspace into geoserver:
Step 1 : After the geoserver has been installed, create a new workspace named “sample_workspace” with URL 127.0.0.1.
Step 2 : Create a store named “sample_datastore” with the following details:
a. Select the PostGIS (PostGIS Database) option
b. Set the the Workspace as “sample_worspace”
c. Set the Data Source Name as “imis_base_building_info”
d. Set the Host with the IP of the database that has been setup
e. Set the port that has been used.
f. Set the database name (base_imis)
g. Set the Schema as building_info.
h. Set the database username and password that has been used.
i. Save the Store
Step 3 : Open to the file:
C:\ProgramData\GeoServer\workspaces\sample_workspace\datastore.xml
Step 4 : Copy the following lines of code:
<entry key="passwd">crypt1:dummyCrypt</entry>
Step 5 : Download the provided zip file (Repository: Deployment_Manual, Sub Directory: Geoserver Workspace Setup) and unzip to your local machine.
Step 6 : Navigate to the datastore.xml of each data store and replace the line of code with the line of code copied in Step 4.
Step 7 : Ensure the following lines of code match the values as well:
<entry key="database">{{DATABASE_NAME}}</entry>
<entry key="host">localhost</entry>
<entry key="namespace">">127.0.0.1</entry>
Step 8 : Once each datastore’s passwd key and other values have been updated, copy the entire workspace folder and paste it into the location: C:\ProgramData\GeoServer\workspaces\
Step 9 : Ensure that the folder name matches the workspace you are importing (base_imis) and that the sub-folder within the folder contains the data stores.
Step 10 : Restart the tomcat service.
Step 11 : Check if the workspace, store, layer and style is present in the geoserver and remove the dummy workspace that was created.
Add New Layers
5.3 Add New Layers
To add a new layer in GeoServer, follow the steps below
• On the left sidebar, select Stores.
• This will open the main Layers page where existing Layers are listed.
• On the Layers page, look for the Add New Layer link or button.
• Click Add New Layer to open the form for entering the details of the new Layer.
To add the new layer select the table you want to add layer to.
Figure 6 Adding new layer
Once you have chosen the table you can either publish or Configure new SQL view, which you can see in the figure 5.
Start IMIS Application
To start the IMIS application, launch the Laravel development server by running the following command in the terminal within the IMIS project directory:
php artisan serve
This command initiates the development server, allowing the IMIS application to run on your local machine. Once the server is running, open a web browser and navigate to http://127.0.0.1:8000 (localhost) to access the IMIS application homepage.